 測試從圖片中辨識
```
from PIL import Image
import tesserocr
image = Image.open("00000.png")
with tesserocr.PyTessBaseAPI() as api:
api.SetVariable("tessedit_char_whitelist", "0123456789")
ans = tesserocr.image_to_text(image)
print(ans)
```
2019-02-25
Python 使用 Tesseract-OCR 做 Captcha 文字識別
markdown
使用 python 語言的 tesserocr 套件做 captcha 的文字驗證測試,此篇只簡要說明套件的安裝和使用。
# 簡介
在網站的登入或註冊過程,會在不同的網站遇到需要輸入驗證碼的場景,在自動化操作的過程可以透過光學文字識別(Optical Character Recognition,OCR)來將影像中的文字分析後輸出成文字。
Tesseract 是一款開源的 OCR 套件,在 python 中要使用 Tesseract-OCR 使用到 tesserocr。
## 安裝 Tesseract-OCR
首先在系統中安裝 Tesseract-OCR:
* 到 [Tesseract Wiki](https://github.com/tesseract-ocr/tesseract/wiki) 依自己使用的作業系統安裝
* Windows 安裝後要將 Tesseract-OCR 的路徑加到環境變數的 PATH 中。
將 `C:\Program Files (x86)\Tesseract-OCR` 加到 PATH 中
## 安裝 tesserocr
* Windows 系統必須下載 whl 檔安裝
step 1. 到[simonflueckiger/tesserocr-windows_build, github](https://github.com/simonflueckiger/tesserocr-windows_build/releases),下載 `tesserocr-2.4.0-cp37-cp37m-win_amd64.whl`。
step 2. 安裝 tesserocr
```
python -m pip install tesserocr-2.4.0-cp37-cp37m-win_amd64.whl
```
step 3. 設定環境設數
安裝完成要在環境變數指定 tessdata 路徑 `TESSDATA_PREFIX=C:\Program Files (x86)\Tesseract-OCR\tessdata`
如果沒有`TESSDATA_PREFIX`的路徑設定,執行時會出現找不到 tessdata path
```
RuntimeError: Failed to init API, possibly an invalid tessdata path?
```
解法一:將 `C:\Program Files (x86)\Tesseract-OCR\tessdata` 資料夾複製到 `C:\C:\Program Files\Python37\tessdata` 的資料夾
解法二:設定環境變數 `TESSDATA_PREFIX` 並指定正確的 tessdata 的路徑,設定好環境變數(可能需要重啟使用的編輯器 cmd 或 vs 才能正常取用新增的環境變數)
## 測試辨識
測試圖片 `000000.png`
 測試從圖片中辨識
```
from PIL import Image
import tesserocr
image = Image.open("00000.png")
with tesserocr.PyTessBaseAPI() as api:
api.SetVariable("tessedit_char_whitelist", "0123456789")
ans = tesserocr.image_to_text(image)
print(ans)
```
 測試從圖片中辨識
```
from PIL import Image
import tesserocr
image = Image.open("00000.png")
with tesserocr.PyTessBaseAPI() as api:
api.SetVariable("tessedit_char_whitelist", "0123456789")
ans = tesserocr.image_to_text(image)
print(ans)
```
Python 將 Base64 字串還原為圖片
markdown
## 取得 Base64 格式
從網站取得
```
import base64
img_data_base64 = request.POST.get("img_data")
img_b64decode = base64.b64decode(img_data_base64)
```
從檔案取得 Base64 然後將 base64 再解碼
```
import base64
img_file = open(r'image.jpg','rb')
img_b64encode = base64.b64encode(img_file.read())
img_file.close()
img_b64decode = base64.b64decode(img_b64encode)
```
# Python 圖片 Base64 解碼還原 PIL.Image 或 Opencv
Base64 解碼為 OpenCV 圖片:
```
import base64
import numpy as np
img_data_base64= request.POST.get("img_data")
img_data=base64.b64decode(img_data_base64)
img_array = np.fromstring(img_data,np.uint8)
img=cv2.imdecode(img_array,cv2.COLOR_BGR2RGB)
cv2.imshow("img",img)
cv2.waitKey()
```
Base64 解碼為 PIL.Image 圖片:
```
from io import BytesIO
from PIL import Image #pillow
img_data_base64= request.POST.get("img_data")
img_data=base64.b64decode(img_data_base64)
image = BytesIO(img_data)
img = Image.open(image)
```
OpenCV 轉換成 PIL.Image 格式:
```
import cv2
from PIL import Image
import numpy as np
img = cv2.imread("image.jpg")
cv2.imshow("OpenCV",img)
image = Image.fromarray(cv2.cvtColor(img,cv2.COLOR_BGR2RGB))
image.show()
cv2.waitKey()
```
PIL.Image 轉換成 OpenCV 格式:
```
import cv2
from PIL import Image
import numpy as np
image = Image.open("image.jpg")
image.show()
img = cv2.cvtColor(np.asarray(image),cv2.COLOR_RGB2BGR)
cv2.imshow("OpenCV",img)
cv2.waitKey()
```
參考資料來源:
https://blog.csdn.net/dcrmg/article/details/80542665
https://blog.csdn.net/qq_19707521/article/details/78403904
https://blog.csdn.net/qq_19707521/article/details/78367617
2019-02-18
Burp Suite 抓取 https 資料
markdown
因為 https 需要替換憑證才能取得資料,所以需要將 Burp Suite 的憑證安裝到瀏覽器中,這篇文章就按步驟在 firefox 中安裝 burp suite 產生的憑證,它可以抓取到 https 中的請求資料。
## 啟動Burp,確認代理已啟動 Proxy
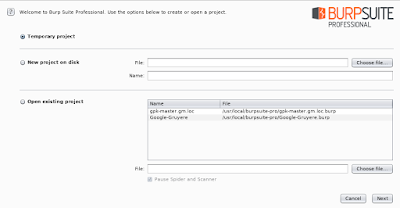
Step 1. 開一個暫時專案,下一步(Next)
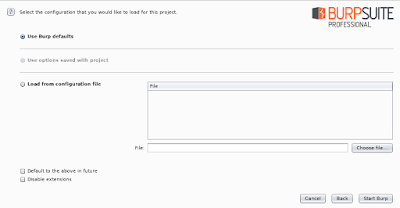
 Step 2. 使用預設設定,開啟(Start Burp)
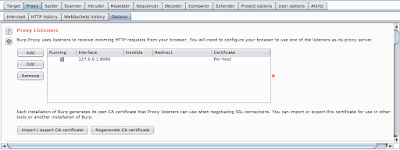
 Step 3. 檢查代理監聽(Proxy Listeners)是啟動狀態
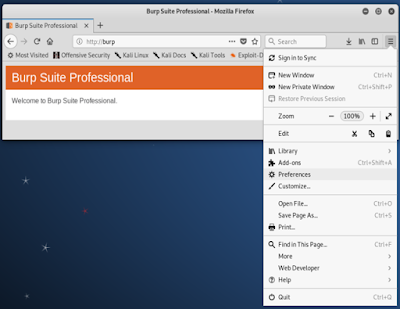
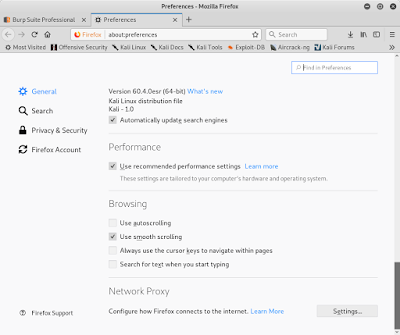
 Step 4. 開啟瀏覽器的設定(Preferences)
 Step 5. 開啟 一般(General)/網路代理(Network Proxy) 的設定(Settings)
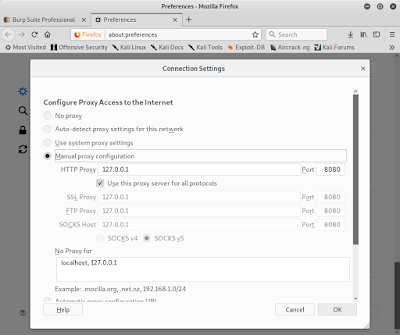
 Step 6. 填入手動設定代理。 host: 127.0.0.1, port: 8080,勾選「全部通訊協定使用這個代理(Use this proxy server for all protocols)」,按確定(OK)
 ## 下載憑證並安裝到瀏覽器
Step 1. 瀏覽器開啟 http://burp
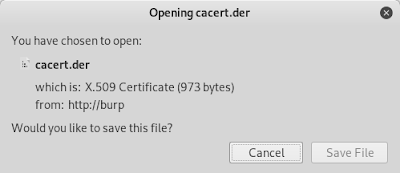
Step 2. 下載憑證
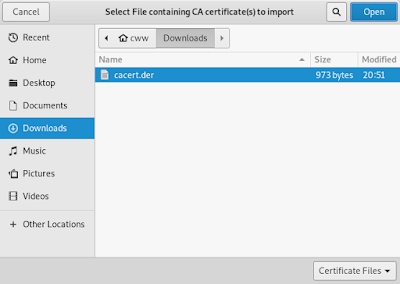
 Step 3. 將 cacert.der 儲存到 `~/download/cacert.der` 資料夾
 Step 4. 開啟瀏覽器的設定(Preferences)
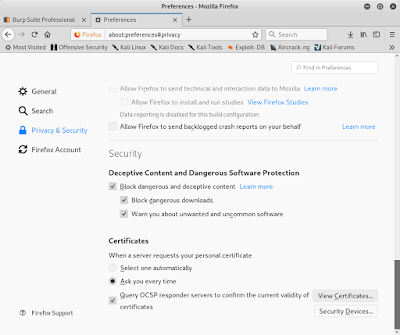
 Step 5. 開啟「隱私和安全(Privacy & Secruity)」,找到憑證(Certificates)區段,開啟「檢視憑證(View Certificates...)」
 Step 6. 選擇 Authorities 頁籤
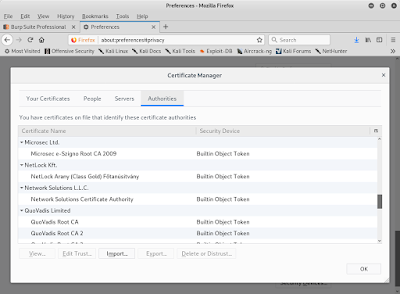 Step 7. 匯入(Import) 步驟2下載的憑證
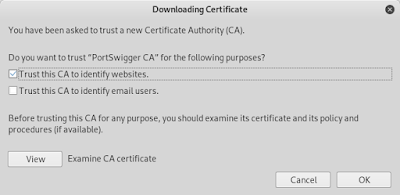
 Step 8. 勾選「信任這個網站(Trust this CA to identity websites)」,按確定(OK)
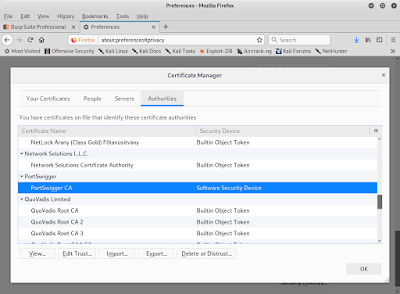
 Step 9. 能在列表中看到剛才匯入的憑證「PortSwigger CA」
 Step 10. 瀏覽器開啟 `https://www.google.com`,在網址列的驚嘆號圖型能看到網站使用的憑證被 Brup 換成 PortSwigger CA 了
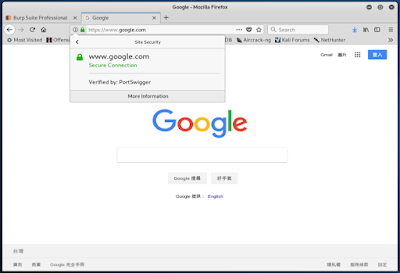 Step 11. 至此在使用 Burp 時就能攔到 https 的包嘍。

 Step 2. 使用預設設定,開啟(Start Burp)
 Step 3. 檢查代理監聽(Proxy Listeners)是啟動狀態
 Step 4. 開啟瀏覽器的設定(Preferences)
 Step 5. 開啟 一般(General)/網路代理(Network Proxy) 的設定(Settings)
 Step 6. 填入手動設定代理。 host: 127.0.0.1, port: 8080,勾選「全部通訊協定使用這個代理(Use this proxy server for all protocols)」,按確定(OK)
 ## 下載憑證並安裝到瀏覽器
Step 1. 瀏覽器開啟 http://burp
Step 2. 下載憑證
 Step 3. 將 cacert.der 儲存到 `~/download/cacert.der` 資料夾
 Step 4. 開啟瀏覽器的設定(Preferences)
 Step 5. 開啟「隱私和安全(Privacy & Secruity)」,找到憑證(Certificates)區段,開啟「檢視憑證(View Certificates...)」
 Step 6. 選擇 Authorities 頁籤
 Step 7. 匯入(Import) 步驟2下載的憑證
 Step 8. 勾選「信任這個網站(Trust this CA to identity websites)」,按確定(OK)
 Step 9. 能在列表中看到剛才匯入的憑證「PortSwigger CA」
 Step 10. 瀏覽器開啟 `https://www.google.com`,在網址列的驚嘆號圖型能看到網站使用的憑證被 Brup 換成 PortSwigger CA 了
 Step 11. 至此在使用 Burp 時就能攔到 https 的包嘍。

2019-01-30
合法練習滲透測試的網站
markdown
進攻即是最好的防禦,這句話同樣適用於信息安全的世界。這裏羅列了很多合法的來練習黑客技術的網站,不管你是一名開發人員、安全工程師、代碼審計師、滲透測試人員,通過不斷的練習才能讓你成為一個優秀安全研究人員。以下網站希望能給各位安全小夥伴帶來幫助!若有其他的補充和推薦,歡迎給留言(排名不分先後)
## 國外
1. [bWAPP](http://www.itsecgames.com/)
免費和開源的web應用進程安全項目。它有助於安全愛好者及研究人員發現和防止web漏洞。
2. [Damn Vulnerable iOS App (DVIA)](http://damnvulnerableiosapp.com/)
DVIA是一個iOS安全的應用。它的主要目標給移動安全愛好者學習iOS的滲透測試技巧提供一個合法的平台。APP涵蓋了所有常見的iOS安全漏洞,它免費並開放源碼,漏洞測試和解決方案覆蓋到iOS 10版本。信息安全工程师[@prateekg147](https://twitter.com/prateekg147)设计并开发。[Getting Started](http://damnvulnerableiosapp.com/2013/12/get-started/)
3. [Damn Vulnerable Web Application (DVWA)](http://www.dvwa.co.uk/)
基於 php 和 mysql 的虛擬 Web 應用,“內置”常見的 Web 漏洞,如 SQL 注入、xss 之類,可以搭建在自己的電腦上
4. [Game of Hacks](http://www.gameofhacks.com/)
基於遊戲的方式來測試你的安全技術,每個任務題目提供了大量的代碼,其中可能有也可能沒有安全漏洞!
5. [Google Gruyere](http://google-gruyere.appspot.com/)
一個看起來很low的網址,但充滿了漏洞,目的是為了幫助那些剛開始學習應用進程安全性的人員。
6. [HackThis!!](https://www.hackthis.co.uk/)
旨在教你如何破解、轉儲和塗改,以及保護網站的黑客技巧,提供超過50種不同的難度水平。
7. [Hack This Site](https://www.hackthissite.org/)
是一個合法和安全的測試黑客技能的網站,幷包含黑客資訊. 文章、論壇和教程,旨在幫助你學習黑客技術。
8. [Hellbound Hackers](https://www.hellboundhackers.org/)
提供了各種各樣的安全實踐方法和挑戰,目的是教你如何識別攻擊和代碼的補丁建議。主題包含應用進程加密和破解,社工和rooting。社區有接近10萬的註冊會員,也是最大的一個黑客社區之一。
9. [McAfee HacMe Sites](http://www.mcafee.com/us/downloads/free-tools/index.aspx)
邁克菲提供的各類黑客及安全測試工具
10. [Mutillidae](https://sourceforge.net/projects/mutillidae/)
是一個免費,開源的Web應用進程,提供專門被允許的安全測試和入侵的Web應用進程。其中包含了豐富的滲透測試項目,如SQL注入、跨站腳本、clickjacking、本地文檔包含、遠程代碼執行等.
11. [OverTheWire](http://overthewire.org/wargames/)
基於遊戲的讓你學習安全技術和概念的黑客網站
12. [Peruggia](https://sourceforge.net/projects/peruggia/)
一個提供安全、合法攻擊的黑客網站
13. [Root Me](https://www.root-me.org/)
通過超過200名黑客的挑戰和50個虛擬環境來提高你黑客技巧和網絡安全知識的網站
14. [Try2Hack](http://www.try2hack.nl/)
最古老的黑客網站之一,提供多種安全挑戰。
15. [Vicnum](http://vicnum.ciphertechs.com/)
OWASP 項目之一,簡單框架,針對不同的需求,並基於遊戲的方式來引導安全開發者學習安全技術。
16. [WebGoat](http://webappsecmovies.sourceforge.net/webgoat/)
最受歡迎的OWASP項目,提供了一個真實的安全教學環境,指導用户設計複雜的應用進程安全問題
17. [Test ASP](http://testasp.vulnweb.com/)
acunetix 提供的測試網站,使用 ASP
18. [Test ASP.Net](http://testaspnet.vulnweb.com/)
acunetix 提供的測試網站
19. [Test PHP](http://testphp.vulnweb.com/)
acunetix 提供的測試網站,使用 asp.net webform 開發
20. [Altoro Mutual](http://demo.testfire.net/)
## 其它
1. [i春秋](http://www.ichunqiu.com/main)
國內比較好的安全知識在線學習平台,把複雜的操作系統、工具和網絡環境完整的在網頁進行重現,為學習者提供完全貼近實際環境的實驗平台,
2. [XCTF_OJ 練習平台](http://oj.xctf.org.cn/)
XCTF-OJ (X Capture The Flag Online Judge)是由XCTF組委會組織開發並面向XCTF聯賽參賽者提供的網絡安全技術對抗賽練習平台。XCTF-OJ平台將彙集國內外CTF網絡安全競賽的真題題庫,並支持對部分可獲取在線題目交互環境的重現恢復,XCTF聯賽後續賽事在賽後也會把賽題離線文檔和在線交互環境彙總至XCTF-OJ平台,形成目前全球CTF社區唯一一個提供賽題重現覆盤練習環境的站點資源。
3. [網絡信息安全攻防學習平台](http://hackinglab.cn/index.php)
提供基礎知識考查、漏洞實戰演練、教程等資料。實戰演練以 Web 題為主,包含基礎關、腳本關、注入關、上傳關、解密關、綜合關等。
## 參考來源:
http://list.ly/list/euz-15-vulnerable-sites-to-legally-practice-your-hacking-skills-2016-update
http://www.freebuf.com/sectool/4708.html
https://www.zhihu.com/question/24740239
https://hk.saowen.com/a/0cefffc20499a78b147ab04a5689ac0e1b6acbb4abecf236e018c36fe232ba0d
https://www.freebuf.com/special/123961.html
2019-01-28
Python Import the class within the same directory or sub directory
markdown
# 引用同一資料夾中的類別
假設有已有如下的資料結構,在 myfolder 中有 Order, Product, User, Manager 四個 class,要引用到 main.py 中使用。
```
myfolder
+-- main.py
+-- subdir
| +-- order.py
| +-- product.py
+-- user.py
+-- manager.py
```
## Python 2
建立一個名為 `__init__.py` 的空檔案,放在同一個資料夾中
在 main.py 中
```
from user import User
from manager import Manager
```
資料夾範例:
```
myfolder
+-- main.py
+-- subdir
| +-- order.py
| +-- product.py
+-- __init__.py
+-- user.py
+-- manager.py
```
如果是要引用子目錄中的類別,則是在子目錄中建立 `__init__.py`
```
from subdir.order import Order
from subdir.product import Product
```
子資料夾範例:
```
myfolder
+-- main.py
+-- subdir
| +-- __init__.py
| +-- order.py
| +-- product.py
+-- user.py
+-- manager.py
```
## Python 3
在同一目錄下引用直接使用 .user,參考如下:
在 main.py 中
```
from .user import User
from .manager import Manager
```
資料夾範例:
```
myfolder
+-- main.py
+-- subdir
| +-- order.py
| +-- product.py
+-- __init__.py
+-- user.py
+-- manager.py
```
2019-01-21
Kali Linux 新增使用者帳號並授與 sudo 權限
markdown
在網路上查閱很多 Kali 的相關文章,大多都是直接使用 root 帳號,在使用 Linux 時通常會建議不要直接使用 root 帳號進行一般事務的管理操作。所以查了如何在 kali 加入新的使用者帳號,操作指令可以參考 Degain 或是 Ubuntu 的文章。
以下 username 都要代換為要新增的帳號
# 新增帳號
1. 開啟 Terminal ,使用 Ctrl+Alt+T,或是點擊左側的 Terminal 圖示,並登入 root 帳號
2. 加入新使用者帳號:
```
useradd -m username
```
-m 建立帳號的 home 目錄,預設路徑是 /home/username
3. 建立帳號的密碼:
```
passwd username
```
4. 將帳號加到 sudo 群組,帳號才能使用 sudo 命令安裝程式:
```
usermod -a -G sudo username
```
-a 加入
-G 指定要加入的群組名稱
5. 給帳號指定預設的 shell:
```
chsh -s /bin/bash username
```
-s 指定登入的 shell
# 移除帳號
1. 將帳號從 sudo 群組移除:
方法1. 使用 deluser:
```
sudo deluser username sudo
```
方法2. 使用 gpasswd:
```
sudo gpasswd -d username sudo
```
2. 將帳號從系統移除:
```
sudo userdel -r username
```
-r 移除帳號的 home 目錄和郵件
# 參考:
* [Adding a new user in Kali Linux](https://www.linkedin.com/pulse/20140502074357-79939846-adding-a-new-user-in-kali-linux)
在 Kali Linux 安裝 Visual Studio Code
markdown
# Kali 安裝 Visual Studio Code
因為 Kali 是以 Debian 為基地的發佈版,所以參考 Debian 或是 Ubuntu 的安裝方式。
```
::decode
# Download the Microsoft GPG key, and convert it from OpenPGP ASCII
# armor format to GnuPG format
curl https://packages.microsoft.com/keys/microsoft.asc | gpg --dearmor > microsoft.gpg
# Move the file into your apt trusted keys directory (requires root)
mv microsoft.gpg /etc/apt/trusted.gpg.d/microsoft.gpg
# Add the VS Code Repository
echo "deb [arch=amd64] https://packages.microsoft.com/repos/vscode stable main" > /etc/apt/sources.list.d/vscode.list
# Update and install Visual Studio Code
apt update && apt install code
```
# 參考
1. [Visual Studio Code on Linux](https://code.visualstudio.com/docs/setup/linux)
2019-01-18
kali 建立應用程式捷徑 (Desktop Entry)
markdown
kali linux 是使用 Gnome 桌面環境,如果要自訂應用程式捷徑和分類可以參考 [Desktop Entry Specification](https://developer.gnome.org/desktop-entry-spec/)。
這裡的情境是從網路下載了 burp suite 要直接建立捷徑執行。假設已將程式下載解壓,並儲存在 /opt/burpsuite 資料夾。
```
root@kali:/opt/burpsuite# ls -l
-rw------- 1 root root 7340 Jan 17 22:20 burpsuite.png
-rwxrw-rw- 1 root root 28215285 Aug 12 19:55 burpsuite_v1.7.37.jar
```
# 資料夾
```
/etc/xdg/menus # 主選單設定
/etc/xdg/menus/applications-merged/kali-applications.menu # kali 預設選單層級和 Category 名稱設定
/usr/share/applications # 將 DesktopEntry 檔案放在這資料夾內(副檔名 .desktop)
/usr/share/desktop-directories # 應用程式分類資料夾設定(副檔名 .directory)
```
# 執行 burp suite
用 java 執行 burpsuite 確認一下能正常啟動應用程式
```
root@kali:/opt/burpsuite# java -jar burpsuite_v1.7.37.jar
```
# 建立程式捷徑
1. 在 /usr/share/applications/ 建立 burpsuite.desktop,內容如下:
```
[Desktop Entry]
Version=1.0
Type=Application
Terminal=false
Icon=/opt/burpsuite/burpsuite.png
Exec=sh -c java -jar burpsuite_v1.7.37.jar
Name=Burp Suite 1.7.37
Path=/opt/burpsuite
Categories=03-webapp-analysis;03-06-web-application-proxies;
```
 2. 設定為可執行
```
root@kali:/usr/share/applications# chmod a+x burpsuite.desktop
```
# 將 Burp Suite 捷徑加到左側 Menu 中
1. 展開 Applications 選單
 2. 拖放至左側選單中
 # 2019-01-21 補充
當另一個帳號登入時應用程式的 icon 沒顯示,因為 icon 圖示沒有權限,所以再加設權限就可以了
```
chmod a+rw /opt/burpsuite/burpsuite.png
```
# 參考連結
* [Desktop Entry Specification](https://developer.gnome.org/desktop-entry-spec/)
* [Desktop Menu Specification](https://specifications.freedesktop.org/menu-spec/latest/index.html)
 2. 設定為可執行
```
root@kali:/usr/share/applications# chmod a+x burpsuite.desktop
```
# 將 Burp Suite 捷徑加到左側 Menu 中
1. 展開 Applications 選單
 2. 拖放至左側選單中
 # 2019-01-21 補充
當另一個帳號登入時應用程式的 icon 沒顯示,因為 icon 圖示沒有權限,所以再加設權限就可以了
```
chmod a+rw /opt/burpsuite/burpsuite.png
```
# 參考連結
* [Desktop Entry Specification](https://developer.gnome.org/desktop-entry-spec/)
* [Desktop Menu Specification](https://specifications.freedesktop.org/menu-spec/latest/index.html)
kali linux 更換 jdk
markdown
使用 kali linux 的 brup suite 會跳出 JRE 版本 10.0.2 沒有完全測試過,可能會發生問題的訊息。
> Your JRE appears to be version 10.0.2 from Oracle Corporation Burp has not been fully tested on this platform and you may experience problems.
# 環境
* Linux kali 4.17.0-kali1-amd64 #1 SMP Debian 4.17.8-1kali1 (2018-07-24) x86_64 GNU/Linux
* Burp Suite Community Edition 1.7.35
[查看版本的參考文章](https://workerdigholes.blogspot.com/2019/01/kali.html)
# JDK 更換或安裝
1. 查看和更改 kali linux 中的 JDK
```
update-alternatives --config java
update-alternatives --config javac
```
2. 如果要使用的JDK 不存在,安裝 JDK
```
update-alternatives --install /usr/bin/java java /opt/jdk-9.0.1/bin/java 300
update-alternatives --install /usr/bin/javac javac /opt/jdk-9.0.1/bin/javac 300
```
注意:/opt/jdk-9.0.1是自己安装的路径。
3. 安裝後再設定成要使用的版本
```
update-alternatives --config java
update-alternatives --config javac
```
選擇編號,按 Enter
4. 檢查 java 版本
```
java -version
javac -version
```
kali 查看版本
markdown
kali 查看版本
* 查看內核版本
```
uname -a
```
* 查看發行版本
```
lsb_release -a
```
執行結果
```
root@kali:~# uname -a
Linux kali 4.17.0-kali1-amd64 #1 SMP Debian 4.17.8-1kali1 (2018-07-24) x86_64 GNU/Linux
root@kali:~# lsb_release -a
No LSB modules are available.
Distributor ID: Kali
Description: Kali GNU/Linux Rolling
Release: kali-rolling
Codename: kali-rolling
```
訂閱:
意見 (Atom)